Pages

Showing posts with label Parties. Show all posts

Halloween Place Card Bats

Sunday, October 23, 2016

When we needed some 'glam' place cards for last year's spooky dinner, I set out to Michael's to see what sparkly supplied would inspire me. As soon as I saw these glittery bats I knew they would make the perfect place cards!

Typically I'd buy some paper, get out my cricut and cut my own shapes but these bats were ready to go saving me a lot of work.  I picked up some glittery letter stickers for the name and that was it. Done.  More time to focus on decor and spooky effects!


Simple Halloween Appetizers

Sunday, October 16, 2016


If you're looking for some spooky Halloween appetizers, here's full spread that's tasty and easy to make!

Eyeballs
(Olives and Mini-Mozzarella Balls)

Worm Infested Apple Crossantini
(Sliced bread with white cheddar, green apple, and caramelized onion, baked)


Open Wound Toasts
(Toast crackers with brie cheese and raspberry jam, baked)

Vulture Brains
(Mushrooms stuffed with blue cheese and bacon, baked)


DIY Valentine's Day Chocolate Buffet

Sunday, January 24, 2016

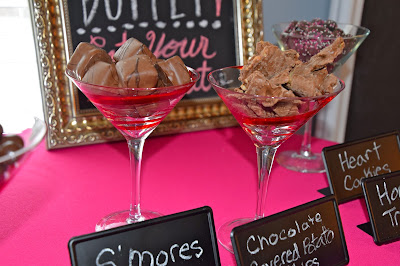
Last year my family visited for Valentine's Day so we set-up a Chocolate buffet! It was so easy to do, I just bought some fun chocolates (mostly from Trader Joe's) and set them out in martini glasses. 

 A chocolate buffet would also be fun for a movie viewing of 'Chocolat' or 'Willy Wonka and the Chocolate Factory'. So many excuses to eat more chocolate!


Halloween Dessert Cake

Sunday, October 25, 2015

 When serving an entire Halloween dinner, make one portion easy on yourself and buy a round cake from your favorite bakery with white icing and draw a spider web on the top using a tube of black icing. Simple and done!

Halloween Chili Bar

Sunday, October 4, 2015


Last year we chose a 'Creepy Chili Bar' theme for our annual Spooky Dinner which was a huge hit! Not only does chili make the perfect fall food, but it's easy to make and can be made in advance so entertaining is easy.

We served two chili's, a classic red chili with beef and a creamy white chili with chicken.  To spook them up I made description cards changing all of the ingredients to their creepy look a likes:


I served the chili with cornbread skulls using the skull pan I purchased to make Zombie Head Meatloaves
'Breadstick Bones' are made by taking a can of refrigerated breadsticks, tying a knot in the end of each breadstick and baking as directed

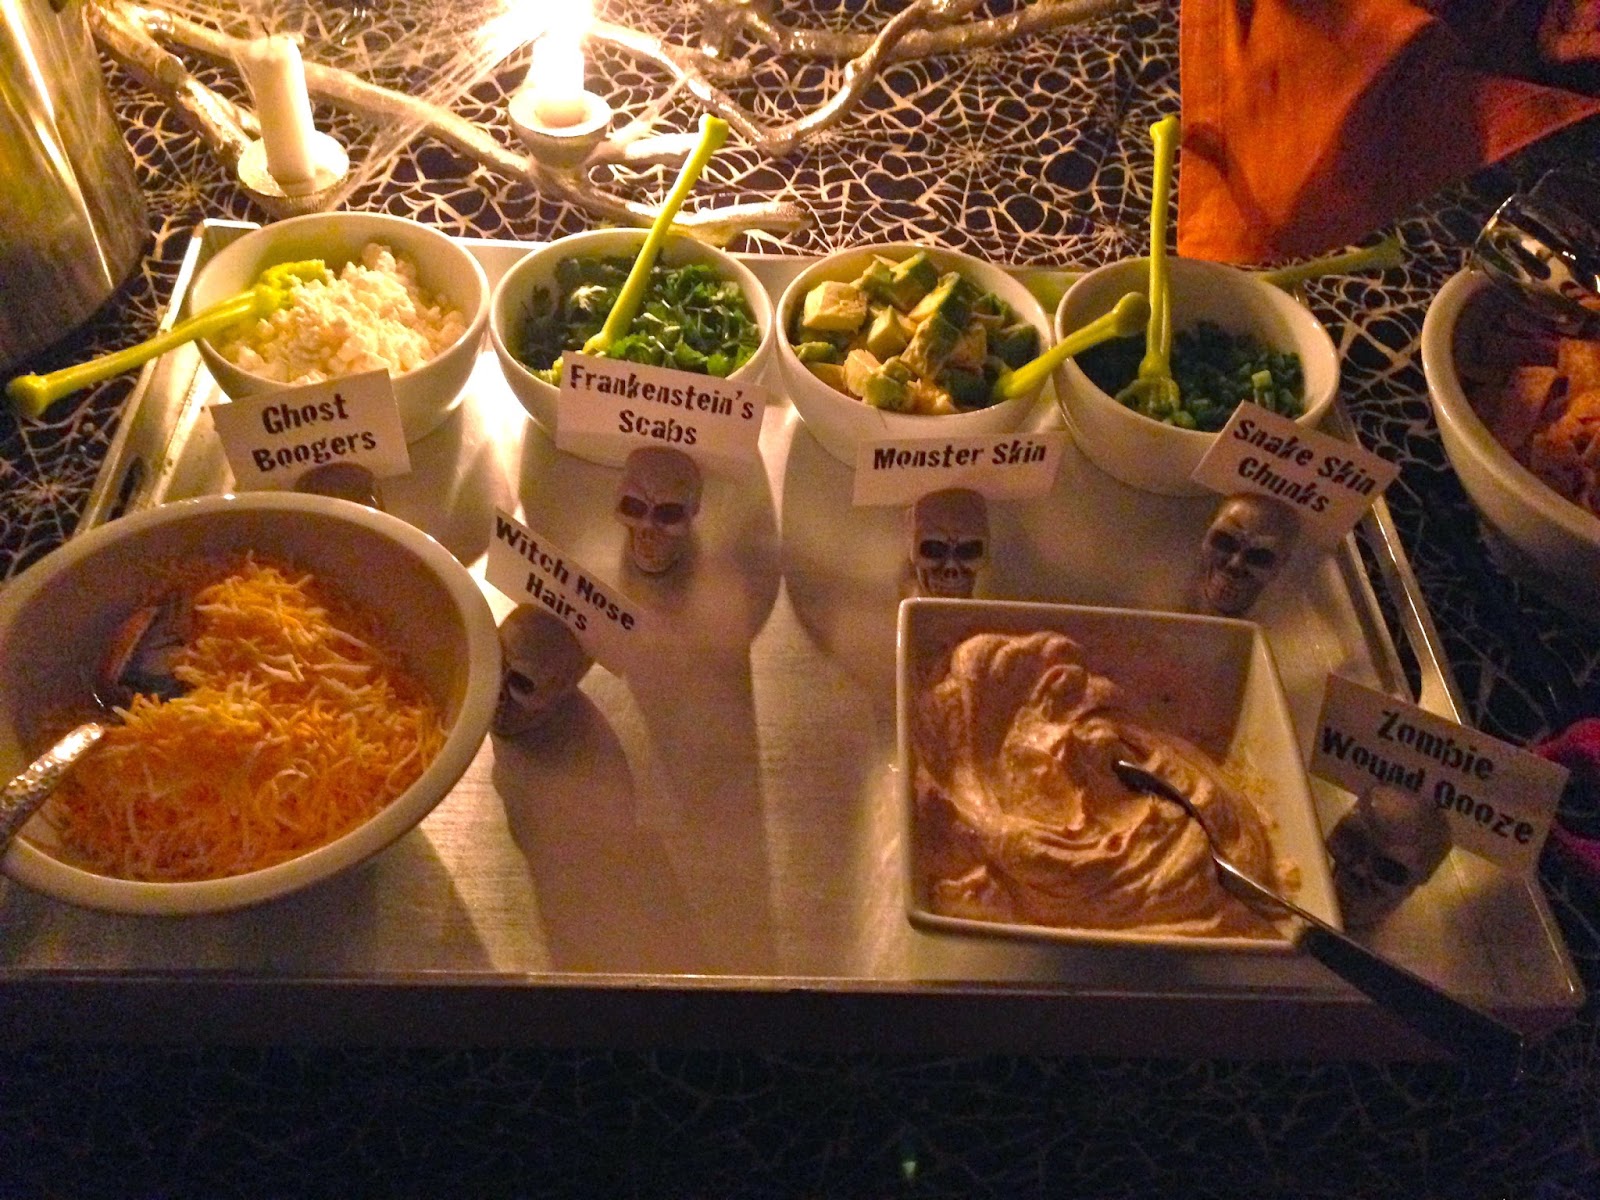
The toppings for the chili also had fun names bringing them from ordinary to spooky.
Fritos and Sante Fe Salad topper chips were 'Mummy Toe Nails' and 'Witch Finger Nails'.

I tried to include every possible topping for the chili and give them a fun name, while touching on all of the classic Halloween characters. Below is the list of toppings with their Halloween name:

Snake Skin Chunks
(Green Onions)

Witch Nose Hairs
(Cheddar Cheese)

Ghost Boogers
(Feta Cheese)

Zombie Wound Oooze
(Seasoned Sour Cream)

Witch Fingernails
(Tortilla Strips)

Mummy Toe Nails
(Fritos)

Frankenstein’s Scabs
(Cilantro)

Monster Skin
(Avocado)

Click Here to view Spooky Dinners from previous years.

Halloween Dinner Party Invitation

Sunday, September 27, 2015

I always think that the invitation sets the tone for a party, and since Halloween parties are usually all-out it's hard to find an invitation that will do the party justice! Here are the invitations I made for our Spooky Dinner last year.  They are actually simple and easy to make, but some minor added details help make them a bit more spooky!
 I typed out the text and added some Halloween clip-art from Google Images, then printed on cardstock. 

I like to put googly eyes on everything I can (they just make everything more fun--especially our Roomba!).  Here googly eyes replace the 'O's in Spooky


The printed skeleton is holding an actual wine glass (well, an actual sticker from Jolee's)

The spider is 3-D, not printed. I cut them out using a punch.


To add a bit more spook factor, I made a sleeve for the invitation using bandages from Walgreens.

A giant spider sticker sealed the bandage around the invite, and I added a few more smaller punch-out spiders.

Here's what the final invitation looked like prior to sending!

Minnesota Themed Beer Tasting

Saturday, September 5, 2015


We had so much fun at last year's beer tasting that we decided to make it an annual event! Since our family was visiting for the Minnesota State Fair, we decided to make the tasting MN themed featuring classic and new MN based beers!

I found some vintage Hamm's coasters at a local antique shop that I put by everyone's place for their tasting glass. 

A growler with some flowers from the landscaping made the perfect centerpiece.

I listed all of the beer and food on a document in Powerpoint and printed a couple of copies for the table. In addition to MN beers, we had cheeses from Minnesota, a sampling of sausages, and a variety of mini bundt cakes.

 
The line-up of all the beers we tasted.

Cheers! Time to start working on next year's tasting theme.

Classy Teacher Retirement Party

Monday, May 25, 2015

Last year my mom retired after teaching elementary for 37 years.  For her retirement party, I wanted to keep it school themed but also wanted it to be bright, colorful, modern, and classy.  Here are a few pictures of the party details!
Welcome to the Party
-I ordered a photo blanket from collage.com with photos of all of my Mom's classes.  It hung for decoration at the party and my mom got to keep it afterwards

-In powerpoint I created a poster using all of the class photos, in order, and typed text over the top. I had it printed in color at Staples for around $20

-We used the book 'The Giving Tree' as a guest book.  Red pens were set out so the ink would be consistent and stand out on the pages.  Instructions to sign the book were printed in chalkboard font and displayed in a frame.

-Instead of a card 'box', I set out a book bag for cards to keep with the school theme.  I chose a plain white bag from Michaels and used my cricut to make the CARDS banner that hung from zipper to zipper

-Flowers displayed in pencil vase and votives in crayon votive holder

-Digital photo frame flashed pictures of all the classes she taught over the years

-A printed photo of her first class was displayed in a frame, labeled using chalkboard font.
Have Something to Eat
-A simple and classy menu for summer: Chicken Salad Croissants, Strawberry Spinach Salad, Lemon Orzo Pasta Salad, and Fruit

-I used Crayola paint samples from Menards to create the food labels and printed the text using crayon font in a coordinating colors

-Chalkboard ABC ribbon tied around jars to hold silverware

-A single large vase of Green Apples popped against my purple tablecloth, and was a fun way to incorporate 'teachers apples'.

Don't Forget Dessert
-The dessert table banner read 'Retirement is Sweet' and was made using a cricut and gluing letters to ribbon

-To create the cupcake toppers, I used an alphabet mold from Michael's to create different colored candy letters using Wilton candy melts in bright colors.  It was time consuming since I only had one mold but easy to do in advance. I spelled 'Congrats Kathy' in cupcakes and displayed on a stand in the center of the dessert table

-I made school bus wrappers for Hershey's Nuggets by designing in powerpoint and printing on yellow paper

-Alphabet cookies from Trader Joe's fit the theme and were great for young guests

And of Course--Wine!
-We set-up a wine station on my Mom's center island so guests would feel welcome to help themselves

-Insulated beverage tubs are great for displaying white whites while keeping them cold, and look stunning for a party

-I have boxes of Libbey wine glasses just for parties. They come in packs of 12 and are easy to store in boxes and transport. I set them out on stacked trays so a lot of glasses can be set out at once without taking too  much room

-Farmers market flowers in pencil vases tied in the teacher theme and added color to the wine station.  

Graveyard Dirt Halloween Dessert

Sunday, October 26, 2014

These 'Graveyard Dirt Cups' were the perfect finish to last year's Spooky Dinner!

Ingredients:
1 pkg. Oreos
8oz. cream cheese
1/2 c. butter
1 c. powdered sugar
1 tsp. vanilla
3 c. milk
2-3.4oz. pkg. chocolate instand pudding mix
1 carton whipped cream, thawed
Gummi worms for garnish

In a large bowl, beat the cream cheese, butter, sugar and vanilla until light and fluffy. In another bowl, whisk milk and pudding mix for 2 minutes (mixture will be thick). Fold in whipped topping. Gently fold into cream cheese mixture until blended. Scoop into individual cups.


Using a food processor, crush the bag of Oreos until they resemble dirt.  Place 2-3 gummi worms in each cup and top with crushed Oreos.


Vampire Kiss Halloween Cocktail

Thursday, October 16, 2014

I served this Vampire Kiss Halloween Cocktail from Sandra Lee at my Spooky Dinner last year which was delicious!

Ingredients:
1 part vodka, chilled
1 part Champagne
1 part Chambord
Garnish with wax teeth/candy corn/blood orange slice
Directions:
Pour vodka in a martini glass, top with Champagne and pour a little of the Chambord over the back of a spoon to make it float.


I poured some grenadine onto a plate to rim the glasses to look like blood.


I froze plastic spiders in ice cubes for a little extra something spooky since I couldn't find wax teeth.


Blogger Template created by Photographic Elements