Pages

Anniversary Wish Box

Tuesday, July 26, 2011


I made this anniversary wish box for my brother and sister-in law as a gift for their rehearsal dinner.  The concept of the anniversary wish box is simple but so great!  

All the guests received a blank note card and a dated envelope.  Everyone wrote the bride and groom a note, then placed it in their envelope without writing on the outside of the envelope.  The dates on the envelope marked the future anniversary when the bride and groom will open the note and discover who it was from. I included monthly anniversaries for the first year, and yearly anniversaries after that up to 25 years.  

At first I wasn't sure how it would go over, but everyone loved writing the bride and groom notes to read later! The rehearsal dinner was a great time to do the activity, since all their closest friends and family were there.

To make the anniversary wish box, I bought some paper and envelopes in the wedding colors at the paper store. I typed out the anniversary dates on my computer.
I used my letter stamps to create custom stationary for the couple.
Here are some examples of the dated envelopes--I just glued the printed paper onto the envelope so I didn't have to mess with labels.
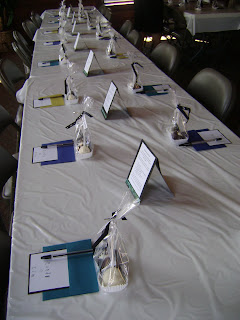
Everyone got a notecard, envelope, and pen at their place setting.
I made instruction card tents that we set out on the tables so guest would know what to do.
A recipe card box was the perfect size to hold the cards!  This one was very inexpensive at Michaels, but not very pretty!
 
I put Mod Podge right on the box to recover it.

Here's the finished product--Peacock feathers to match their wedding theme!

Here are the cards set-out on tables at the dinner, along with the awesome bride and groom cake pops that my mom made for favors!

Bride Undies!!

Sunday, July 24, 2011


For my Bride friends, I usually make personalized undies to go with their bachelorette gifts, since I almost always have coupons for free VS undies!  I just use leftover iron on letters to personalize them!  Sometimes I'll tie hot pink ribbons or fake diamond rings to the sides too.

Sorry Alli, Jena, Jayme, and Kim for posting pictures of you underwear on the internet! 
I owe you all drinks!

Craft Club: Guy Birthday Cards

Monday, July 18, 2011


I made guy birthday cards at Craft Club last week using fishing, camo, and 'tool' paper--very simple!


Bride Hoodie

Sunday, July 17, 2011

Sometimes I like to make these personalized hoodies for my Bride friends!  I use lightweight white hoodie zip-ups so they can wear them to get their hair done on the big day!

Start with some iron on letters.  I buy a couple packs if I'm going to make a few, because the 'M', 'R', and 'S's get used up fast!  Wal-mart has the best deals on iron on letters--even cheaper than Michael's with a 40% off coupon.


All you have to do is iron them on!  I usually say "Soon to be....Mrs. ____ (T or D or B, you get it)" or "Future Mrs. ______"


Sometimes I use a fake diamond ring for the exclamation point!
 
Leftover letters can be used to make a Bride Tank for the bachelorette Party too!

Photo Display Tray

Sunday, July 10, 2011

I had too many ideas for shower photo displays and I couldn't pick just one, so I made this photo tray too!  Again, I wanted to make something they could keep and display in their home.  

I LOVE these trays made by 7 Gypsies and all of the creative ways people decorate them! I was dying to make something with one of these!  I used this one and got it at Archiver's.It was so easy--I filled in most of the rectangles with photos and added some ribbon, letter stickers, scrabble letters, and other scrap booking trinkets!


Congrats Randy and Kim!!

Tile Coasters

Monday, July 4, 2011


I made a bunch of these tile coasters for Christmas gifts last year. They were so nice to have on hand for gifts that I just made another batch!  I also gave some in the Handmade Gift Exchange.

Start with some basic tile about 3-4"wide.   I got mine at Lowes for $0.34 each.  The color doesn't matter since they'll be covered up, but I do look for some that have a smooth top.

Cut Paper to size to fit the top of the tile.  I use whatever fun scrapbook papers I like and coordinate colors to make a set of coasters.
Apply a thin layer of Mod Podge to the top of the tile.
Set the paper square on top of the wet Mod Podge.
Apply a thin coat of Mod Podge to the top of the paper to seal it to the tile.
Allow time for the Mod Podge to dry.  It goes on white but dries clear.
After the top coat of Mod Podge is dry,  spray them with a clear sealer so the moister from glasses won't make the paper bubble.
Here's the sealer I use:
Cut squares out of foam paper to back the tiles so they won't scratch tables. I cut the squares slightly smaller than the tile.
I use Mod Podge to apply the foam to the backs as well.


Here it is! The finished coaster.

Here are some examples of some coordinating sets that I've made:


Blogger Template created by Photographic Elements