Pages

Simple Must Haves: Ceiling Fan Pulls

Thursday, February 27, 2014

I've never really liked ceiling fans, but since I found these cool fan and lightbulb pulls at Lowes, I have been able to tolerate them! I think they were around $7 but they look like something from a specialty store.

Here they are in my craft room.  I love how they're just a little hint of fun!

Birthday Cupcake Kit

Sunday, February 23, 2014

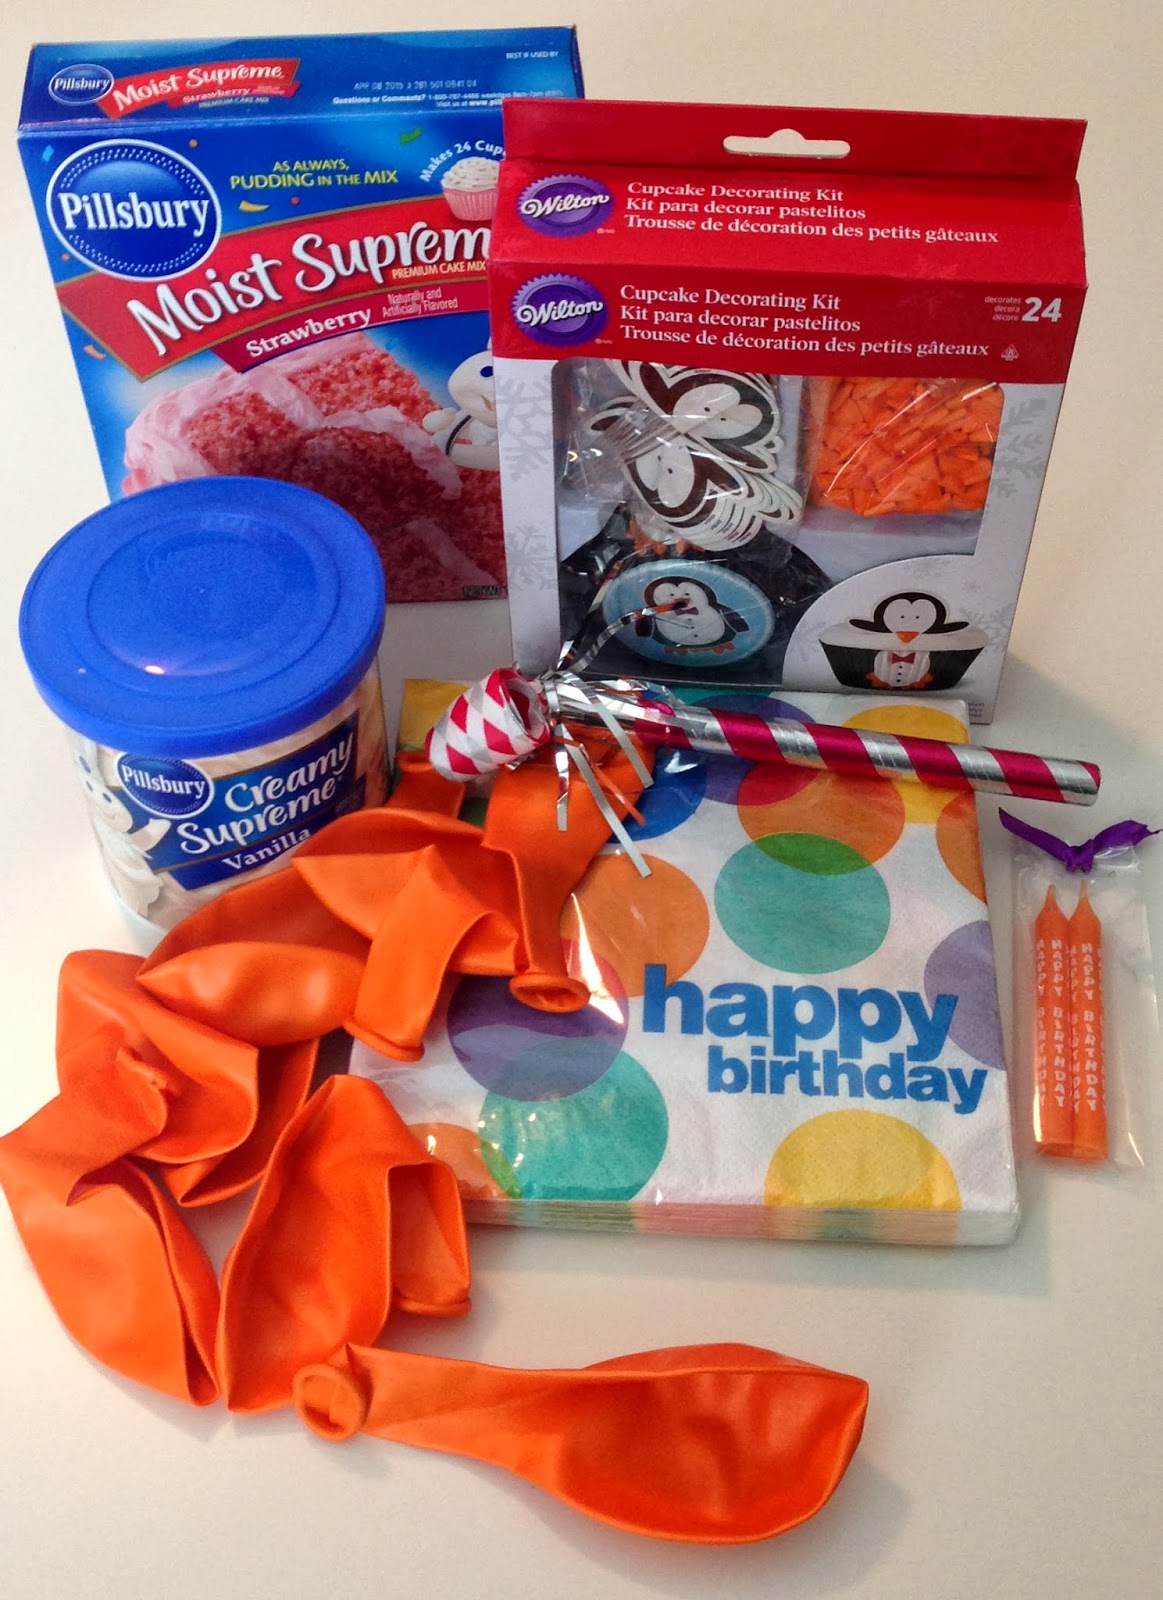
Our sister in-law loves penguins, so when I saw this penguin cupcake kit I had to get it for her upcoming birthday. 
She doesn't live near us so I couldn't just make the cupcakes for her, so instead I put together everything she needed for a fun little bithday party!


Here's what I included:
-The Penguin decorating kit, which included cupcake liners and toppers
-Her Favorite cake mix and frosting
-Birthday Napkins
-Candles in coordinating colors
-Balloons


Moose Mousse Valentine's Dessert

Wednesday, February 19, 2014

 Mousse was something I had never made but always wanted to try.  When I saw this mousse recipe made on Twin Cities Live, I knew I would be making it for Valentine's Day.  Since my nephew's nickname for my husband is 'Moose', I decided to make 'Moose Mousse' for our Valentine's dessert!

To make the chocolate antlers, find a drawing of moose antlers on google images.  Copy/paste it into powerpoint and adjust it to the size that will work with your serving dish.  Since I was making two moose, I copied 4 antlers and printed.


Cover the printed paper with wax paper to trace the antlers in melted chocolate.


I decided to go with pink antlers for contrast and for Valentine's Day, but any color will work.  To get the pink, melt a chunk of white almond bark with two red candy melt discs.


After melting the chocolate in a plastic bag, snip the corner of the bag with a scissors and it's ready to pipe onto the wax paper.  Outline the antler first, then go back and fill in with more chocolate.


Using a large muffin scoop, scoop mousse into a martini glass.  The humps created by the scoop give the head and nose their shape. The mousse didn't set-up like I wanted it to, so I had to whip mine in the mixer before scooping.


To create the moose face, add the hardened chocolate antlers, raspberries stuffed with white chocolate chips for eyes, a strawberry slice tongue, and the typical mint leaf garnish with the tongue so it looks like he's eating it!


Blender Chocolate Mousse 
Courtesy of The Cooking Mom


Ingredients:
1 cup semisweet chocolate chips
1 egg, room temperature
1 teaspoon coffee liqueur or vanilla extract
1 cup heavy cream
Fresh whipped cream (optional)
1/2 cup fresh berries (optional)
Directions:
Place chocolate chips, egg and coffee liqueur or vanilla in blender and chop. Heat cream until very hot and small bubbles appear at edge. Carefully pour hot cream into the blender. Blend until chocolate is melted and mixture is smooth. Pour into dessert dishes or pretty wine or martini glasses. Cover with plastic wrap and refrigerate until it firms up a bit. Serve with fresh berries and/or whipped cream on top. Makes enough for 2 to 3 servings depending on the size of the dish.

'Girls' Night In' Valentine's Day Gift

Thursday, February 13, 2014

Happy Valentine's Day!

Here is a little Valentine's gift I put together this year with the theme is 'Girls Night In'. Here's what I included:
-Mini heart-shaped box of valentine chocolates
-Single Serving glass of red wine
-My favorite oxblood nail polish, Revlon's 'Vixen'
-Valentine's card I made using my 'Simple Holiday Cards' Cricut cartridge
All wrapped up in a cute valentines' bag I found at Target that matches everything inside!

Look here to view my 'Just Add Chocolates' Valentine's Day gift from last year.

Heart Crab Cakes

Wednesday, February 12, 2014


These crab cakes are the perfect Valentine's Day appetizer to be served with heart salads with homemade croutons!

Heart Crab Cakes
1-6oz. can crab meat (I use Trader Joe's)
1 egg, beaten
1/4 c. panko breadcrumbs
1/4 c. seasoned breadcrumbs
2 T. lemon Juice
1 tsp. Old Bay seasoning
1 T fresh chopped parsley
Salt & Pepper to taste
butter and oil for frying

Mix together all ingredients.  They should be a damp and moist but hold together when pressed together. If mixture it too dry, add a little milk until the consistency is correct. 
Press the mixture into a heart shaped cookie cutter to form a heart shaped patty.  Fry in a frying pan in a mixture of about 1T butter and 1T olive oil for each side.
After each side is browned, remove from heat and place on a plate (I garnish with arugula and tomatoes).  Serve with crab cake sauce on each crab cake or on the side.

Crab Cake Sauce
1/4 c. Mayo
1 tsp. lemon juice
1 tsp. Old Bay seasoning

Mix together until all ingredients are incorporated.

Heart Salads with Homemade Heart Croutons

Sunday, February 2, 2014


These heart salads are a great addition to any Valentine's or anniversary dinner, and easy to create by making a few easy changes to your typical salad!

Using a small heart cookie cutter, cut cheese slices and red peppers into heart shapes. Add to your favorite salad, along with homemade heart  croutons.

Homemade Heart Croutons:
Bread
Herbs de Province
Olive Oil

Using whatever bread you have on hand, cut out heart shapes using a small heart cookie cutter.  Place on cookie sheet, drizzle with olive oil and herbs de province.  Bake @ 350 degrees for 20-25 minutes, or until golden brown and crunchy.


Felt Heart Wreath

Sunday, January 26, 2014


Although this heart wreath is made out of felt, it almost looks like roses from far away. It was easy and inexpensive to make, although it took some time!
I started with a 12" foam heart from JoAnn's.  I traced the bottom of a soup can to create a circle template, them cut about 200 circles out of red felt.  I folded the fabric to cut more than one a time, but it still took a while!
I then folded the circles in half, then half again, and used a pin to hold the fold and apply the felt circles to the front side of the foam heart.


I strongly suggest investing in one of these thimbles if you are going to be pushing in a lot of pins to make a wreath--totally worth it!

I pinned a pink ribbon to the back so the wreath could be hung. Here it is on my door!

Simple Holiday Cards Cricut Cartridge Tutorial

Sunday, January 19, 2014


The Simple Holiday Cards Cricut Cartridge was one of my Black Friday purchases from JoAnn's this year.  Since it comes with no instructions, even online (thanks Cricut!!), I thought I'd share.  It took me about half a day to figure out, but now I think I have it! 

Here are my two biggest questions answered:

1.  What size paper do I use?  It made sense to me to use a sheet of paper cut in half like I would use if I were making a card (8.5"x5.5"), but it didn't say anywhere so I had to guess.  The cartridge is set-up to take a full sheet of paper, cut out the design, then cut out the card.  However, I found that if you position the 8.5"x5.5"paper correctly on the mat, it will cut out the design and you can stop the machine before it starts to cut out the perimeter of the card.

So this leads me to my next question......

2. How do you load the paper for making vertical and horizontal cards?  I had to play around with this a bit to find the exact position, which I then marked on my Cricut mat using a permanent marker. I'm not sure if each Cricut is the same, but this is how I positioned the paper on my mat. Once I had this, all horizontal cards were the same, and all vertical cards were the same.

Positioning for Vertical Cards:
-Lay paper vertical
-From starting position, move paper 3/16" to the left
-Move paper down 7/16"


Positioning for Horizontal Cards:

-Lay paper horizontal
-From starting position, move paper 1/4" to the left
-Move paper down 7/16" 

Once I got it figured out I love the cards it makes, and I think the cartridge has easily paid for itself! I did not have any trouble with it cutting out the small detail, but I did run my Cricut on a low speed.  Here are some of the cards I made using the Simple Holiday Cards Cricut Cartridge:


Box of Homemade Cards Gift

Sunday, January 12, 2014

A few years ago I made some cards for my mom and mother in law which were a big hit as it saved them from always having to go and buy cards. Whenever I make cards I usually make a few of the same style, as it's just as easy as making one.  I decided to make a box of cards for my mom and mother in law again using the extra cards I make.  After about a year and a half of making cards at craft club, they each got a box of 130+ cards for Christmas!

That's a lot of cards!

The dividers are made out of index cards to distinguish the different occasions.  I printed the titles on colored paper, cut, and glued them to the top of the index cards.

I included this birthday calendar which I printed from here so they can easily keep track of everyone's birthdays.

Here it is all packed up with envelopes and ready to give!

Here are some examples of the different cards I included by occasion.
Baby:

Engagement/Wedding/Bridal Shower/Bachelorette:

Any Occasion:

New Home:

Sympathy:

Holidays:

Thank You:

Boy Birthday:

Girl Birthday:


Balloon Gift Wrap

Sunday, January 5, 2014

I have quite a few balloons left over from the Birthday Wreath I made a while back, so I thought it would be fun to use them to embellish a birthday gift! I just tied them to some ribbon to add some color and texture to the wrap.
Blogger Template created by Photographic Elements