Pages

Showing posts with label Fall. Show all posts

Mummy Halloween Shirts for Kids

Thursday, October 6, 2016


When I saw this tutorial for a mummy Onesie on Carolina Charm last year, I had to make one for my newborn Niece!  Since it was so easy I made one for my Nephew on a boys's shirt so they could match.  The strips are actually the bottom of my craft room curtains that was cut off when I hemmed them.    I love how they turned out!

Fall Fireplace Mantle

Sunday, September 18, 2016

Fall is here!  If you have a fireplace mantle in your home, this is a simple way to decorate it now that will carry through Thanksgiving.  

Cover with some greens, add a variety of small pumpkins including some gold for glam, and finish with a couple of simple white candles.  

Everything I used is (fake!) from Michaels so I only had to buy it once, but it would look stunning with real greenery and pumpkins!


Fall Sangria

Wednesday, September 7, 2016

This Fall take on Sangria is perfect for any Fall activity, from sipping on a chilly deck to serving at Thanksgiving.  Since it's Maroon and Gold it's even great for Gopher tailgating! 

Fall Sangria
 To a pitcher or craft add:
 1-2 cinnamon sticks
1-2 apples, cubed
2 orange slices

Fill with half apple cider, half white wine (I use Sauvignon Blanc, but any white will do).

The rations are just a suggestion and can be altered to taste. Make a day ahead for the flavors to incorporate.  Serve with some of the fruit in each glass.  I'll add more wine and cider to the same pitcher as I drink it so I can make it once and enjoy all weekend!

Fall Themed Brunch

Sunday, November 1, 2015

This Fall we hosted a group of friends for a weekend brunch.    I wanted to incorporate some Fall flavors, but I also wanted to take some shortcuts since the weeks before and after were crazy! Here is a simple Fall Brunch Menu and shortcuts/items to make it easy yet seasonal!
 
Fall Brunch Menu
*Mini-Quiche
*Sausage Links with Maple Syrup
*Baked Oatmeal
*Harvest Salad
*Pumpkin Danish
 
I found a pumpkin Danish and Harvest Salad kit at Trader Joes.  They always have a great selection of seasonal items.
 
Although I try not to serve a lot of frozen foods, these mini quiches from Whole foods were fancy and no-mess!
 
I kept the décor simple with Fall leaf napkins and Fall floral arrangements.  I used our copper Moscow Mule mugs to hold the silverware. They were the perfect color!
 
This simple menu would be great to serve around Thanksgiving as well--one less meal to make from scratch!

Halloween Gift for Guys

Wednesday, October 28, 2015

I like Halloween even more than Christmas, which means I give Halloween gifts! Guys can be tough to buy themed gifts for, so rather than waste money on Halloween junk I chose to go with orange and back snacks and some Halloween themed and Oktoberfest beers.  It's amazing what you can find when you look outside the holiday aisle for holiday treats--jerky in a dark charcoal and black packaging looks creepy if you want it to!

Halloween Bar Cart and Drinks

Sunday, October 18, 2015

Creating a Halloween themed bar or bar cart is easy and fun to put together whether you're entertaining or not! Here are a few details to help bring an average bar to a haunted bar.

Themed napkins in an elegant holder helps takes the cheesiness out of halloween for an adult bar cart

Labels easily transform ordinary beer and wine into festive beverages

Small lighting accents help guests navigate the bar area with main lights off

These crystal wine gobblets from Goodwill help add a 'haunted mansion' feel without being 'Halloween themed'

Fake bugs on a serving tray make everyday entertaining pieces scary


A few small strategically placed Halloween accents allow guest to discover something spooky in ordinary places


Fall Snack Mix

Wednesday, October 14, 2015


This peanut/candy corn snack mix is perfect to set out for company during the Fall, and it's so simple to make!  Just mix a bag of candy corn with peanuts (I use honey roasted).  It's festive and is great to munch on while watching football games.

Happy Fall!


Halloween Chili Bar

Sunday, October 4, 2015


Last year we chose a 'Creepy Chili Bar' theme for our annual Spooky Dinner which was a huge hit! Not only does chili make the perfect fall food, but it's easy to make and can be made in advance so entertaining is easy.

We served two chili's, a classic red chili with beef and a creamy white chili with chicken.  To spook them up I made description cards changing all of the ingredients to their creepy look a likes:


I served the chili with cornbread skulls using the skull pan I purchased to make Zombie Head Meatloaves
'Breadstick Bones' are made by taking a can of refrigerated breadsticks, tying a knot in the end of each breadstick and baking as directed

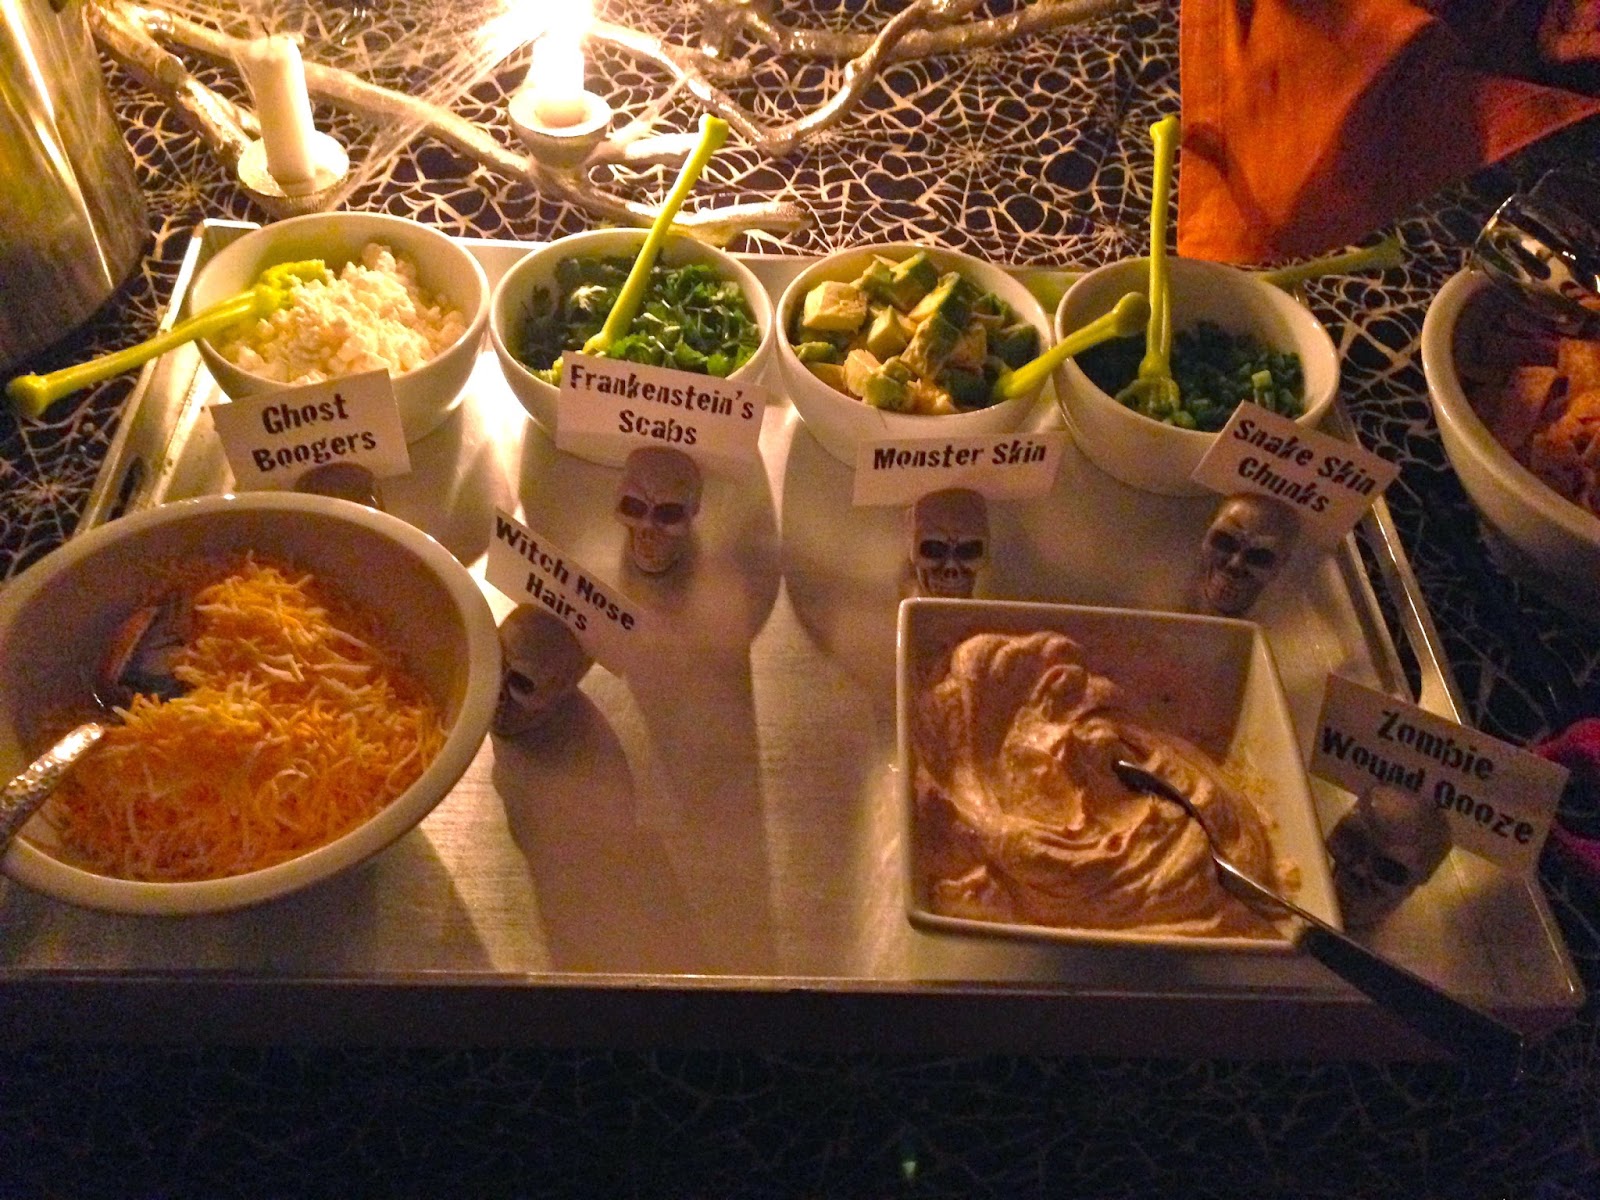
The toppings for the chili also had fun names bringing them from ordinary to spooky.
Fritos and Sante Fe Salad topper chips were 'Mummy Toe Nails' and 'Witch Finger Nails'.

I tried to include every possible topping for the chili and give them a fun name, while touching on all of the classic Halloween characters. Below is the list of toppings with their Halloween name:

Snake Skin Chunks
(Green Onions)

Witch Nose Hairs
(Cheddar Cheese)

Ghost Boogers
(Feta Cheese)

Zombie Wound Oooze
(Seasoned Sour Cream)

Witch Fingernails
(Tortilla Strips)

Mummy Toe Nails
(Fritos)

Frankenstein’s Scabs
(Cilantro)

Monster Skin
(Avocado)

Click Here to view Spooky Dinners from previous years.

Halloween Dinner Party Invitation

Sunday, September 27, 2015

I always think that the invitation sets the tone for a party, and since Halloween parties are usually all-out it's hard to find an invitation that will do the party justice! Here are the invitations I made for our Spooky Dinner last year.  They are actually simple and easy to make, but some minor added details help make them a bit more spooky!
 I typed out the text and added some Halloween clip-art from Google Images, then printed on cardstock. 

I like to put googly eyes on everything I can (they just make everything more fun--especially our Roomba!).  Here googly eyes replace the 'O's in Spooky


The printed skeleton is holding an actual wine glass (well, an actual sticker from Jolee's)

The spider is 3-D, not printed. I cut them out using a punch.


To add a bit more spook factor, I made a sleeve for the invitation using bandages from Walgreens.

A giant spider sticker sealed the bandage around the invite, and I added a few more smaller punch-out spiders.

Here's what the final invitation looked like prior to sending!

Thanksgiving Turkey Card

Thursday, November 6, 2014

We sent these Thanksgiving Turkey Cards out to family and friends last fall. Although they are 3-D they're actually very easy to make!

For the feathers, score lines every .5" on a piece of scrap paper about 8" long and about 1.5-2" wide.
Tip: If making more than one, score a larger sheet of paper then cut to save time on scoring!

After I scored the paper, I cut it in half since I would use it for two feathers.  Fold the paper like an accordion using the scores.

Bend the accordion to make a half circle.  Attach the ends to the card. Use a hot glue gun to catch the folds to secure the rest of the 'feathers' to the cards.
I cut out the turkey body using my cricut and Animal Kingdom cartridge, then glued wiggly eyes for something fun. 

Inside the card I attached the 'Gobble Gobble' which were also cut out using the cricut.  Only the ends are glued so the phrases pop out when the card is opened.

Graveyard Dirt Halloween Dessert

Sunday, October 26, 2014

These 'Graveyard Dirt Cups' were the perfect finish to last year's Spooky Dinner!

Ingredients:
1 pkg. Oreos
8oz. cream cheese
1/2 c. butter
1 c. powdered sugar
1 tsp. vanilla
3 c. milk
2-3.4oz. pkg. chocolate instand pudding mix
1 carton whipped cream, thawed
Gummi worms for garnish

In a large bowl, beat the cream cheese, butter, sugar and vanilla until light and fluffy. In another bowl, whisk milk and pudding mix for 2 minutes (mixture will be thick). Fold in whipped topping. Gently fold into cream cheese mixture until blended. Scoop into individual cups.


Using a food processor, crush the bag of Oreos until they resemble dirt.  Place 2-3 gummi worms in each cup and top with crushed Oreos.


'Head of Zombie' Halloween Meatloaves

Sunday, October 19, 2014

These 'Baby Zombie Head' meat loafs were the entree at our Spooky Dinner last year.  It's my basic meatloaf recipe, so they're tasty!

Meatloaf:
1lb. ground beef
1 egg, beaten
1/2c. oatmeal
1/4c. chopped onion
1/4c. ketchup
1 T steak sauce
1/2 tsp black pepper
1/4 tsp salt
1/4 tsp basil
1/4 tsp garlic powder

Sauce:
1/2 c. ketchup
3 Tbs. brown sugar
1 tsp mustard

Mix the meatloaf ingredients and pack into the pan. If you don't have a pan, try shaping into a head-shape and place on a cookie sheet to bake.

This cake pan was perfect for shaping the heads:

Bake for 30 min @ 350 degrees.  Flip onto a cookie sheet.
Cover each meatloaf with sauce. Use olives, onions, red peppers, banana peppers, or what ever you have to decorate the faces.
Return to oven and continue baking for 20-30 min. until sauce has caramelized.

DIY Skull Halloween Place Card Holders

Thursday, October 9, 2014

For our Spooky Dinner last year, I wanted to have themed place card holders without spending a lot of money.  I was able to make my own set for only $1!!

I started with a bag of 12 plastic skulls that was only $1.

Using a sharp knife and a cutting board, I cut a slit through each of the hollow skulls to hold the place card.
 

I printed everyone's name on a piece of white card stock. The font I used is called 'Cracked'.  

The slit I cut holds each name card perfectly!
These would also look great spray painted silver or gold for a 'glam' halloween!


Blogger Template created by Photographic Elements