Pages

Cuttlebug Folder Reference Ring

Sunday, July 5, 2015


It's so hard to remember what Cuttlebug folders I own, so one night at Craft club I decided to make a reference ring with samples of each folder. 

I simply cut white paper to size and embossed a sheet for each folder.  I folded a piece of washi tape over the top and punched a hole through it so I could put the sheets together on a ring.  I used a ring so it would be easy to add more as I buy more folders.

The tape not only kept the hole from tearing, but I used different colors for different size folders (regular, extra large, tags, and borders).

I store the ring all of my folders and sometimes put it in my purse when I'm shopping so I don't buy duplicates!  There are some folders that I hardly ever grabbed, but when I saw how the patterned looked embossed they were some of my favorites!


Goodwill Dresser Turned TV Console

Sunday, June 28, 2015

What is wrong with me?!? 

That's exactly what I asked my husband the night I picked-up this beast for $40 from Goodwill:
You see I've spent the past 10 months re-designing our living room, which all started because our previous furniture was all from Goodwill and I felt like we were at a point in our lives where we should be past that. So, I sold our entire living room on craigslist to make room for all the great new pieces I was going to buy. Then I come home with this Goodwill gem; uglier, less expensive, more damaged and more out-dated than anything I had ever bought. Look at that drawer! Even I kind of thought I was crazy.

We were in need of a new TV console for the living room. I wanted something substantial with character and that didn't have open shelves.  Everything I liked was over $2,000 and was complete crap in terms of quality, so for $40 I decided to take a chance on the ugly dresser. We set it up in the living room and lived with it a while before I invested my time into painting it.  Even missing the trim on one drawer, it turned out to work great for us! 

We were able to have a local frame shop make a new trim piece for the drawer that was trim-less. It's not a perfect match but no one can tell! We sanded the dresser than painted it white using our Ben Moore trim paint.

My original plan was to replace the hardware to something more modern, but I fell in love with the details in the original hardware.  I sprayed them with oil rubbed bronze spray paint to darken them from the original brassy color.


The best part is the storage! It has 6 large drawers plus 3 hidden drawers in the cabinet. We are able to store all of our photo albums and lay our place mats flat with room to spare!

Overall I'm very happy with our new TV console. Saving $1,960 by being creative doesn't hurt either.

Easy Grilled Pizza Night

Sunday, June 21, 2015

This is easily one of my favorite summer meals, because it's so fun, easy, and tasty! 
It's our go-to for lazy Friday nights, weeks full or work travel, or even entertaining. 
The menu is simple: wine, spinach artichoke dip, and take and bake pizza!

Since we eat almost every meal on the deck in the summer, I keep a tray in the kitchen to carry everything outside in one trip.  It makes it easy to carry everything back in too!

 
Step one: Open the wine. Then I put on some music, snuggle into the deck pillows and let my husband take over the grilling!
Protocolo is my favorite type of wine to have with grilled pizza, so I stock-up during the summer since we have this meal a lot!  

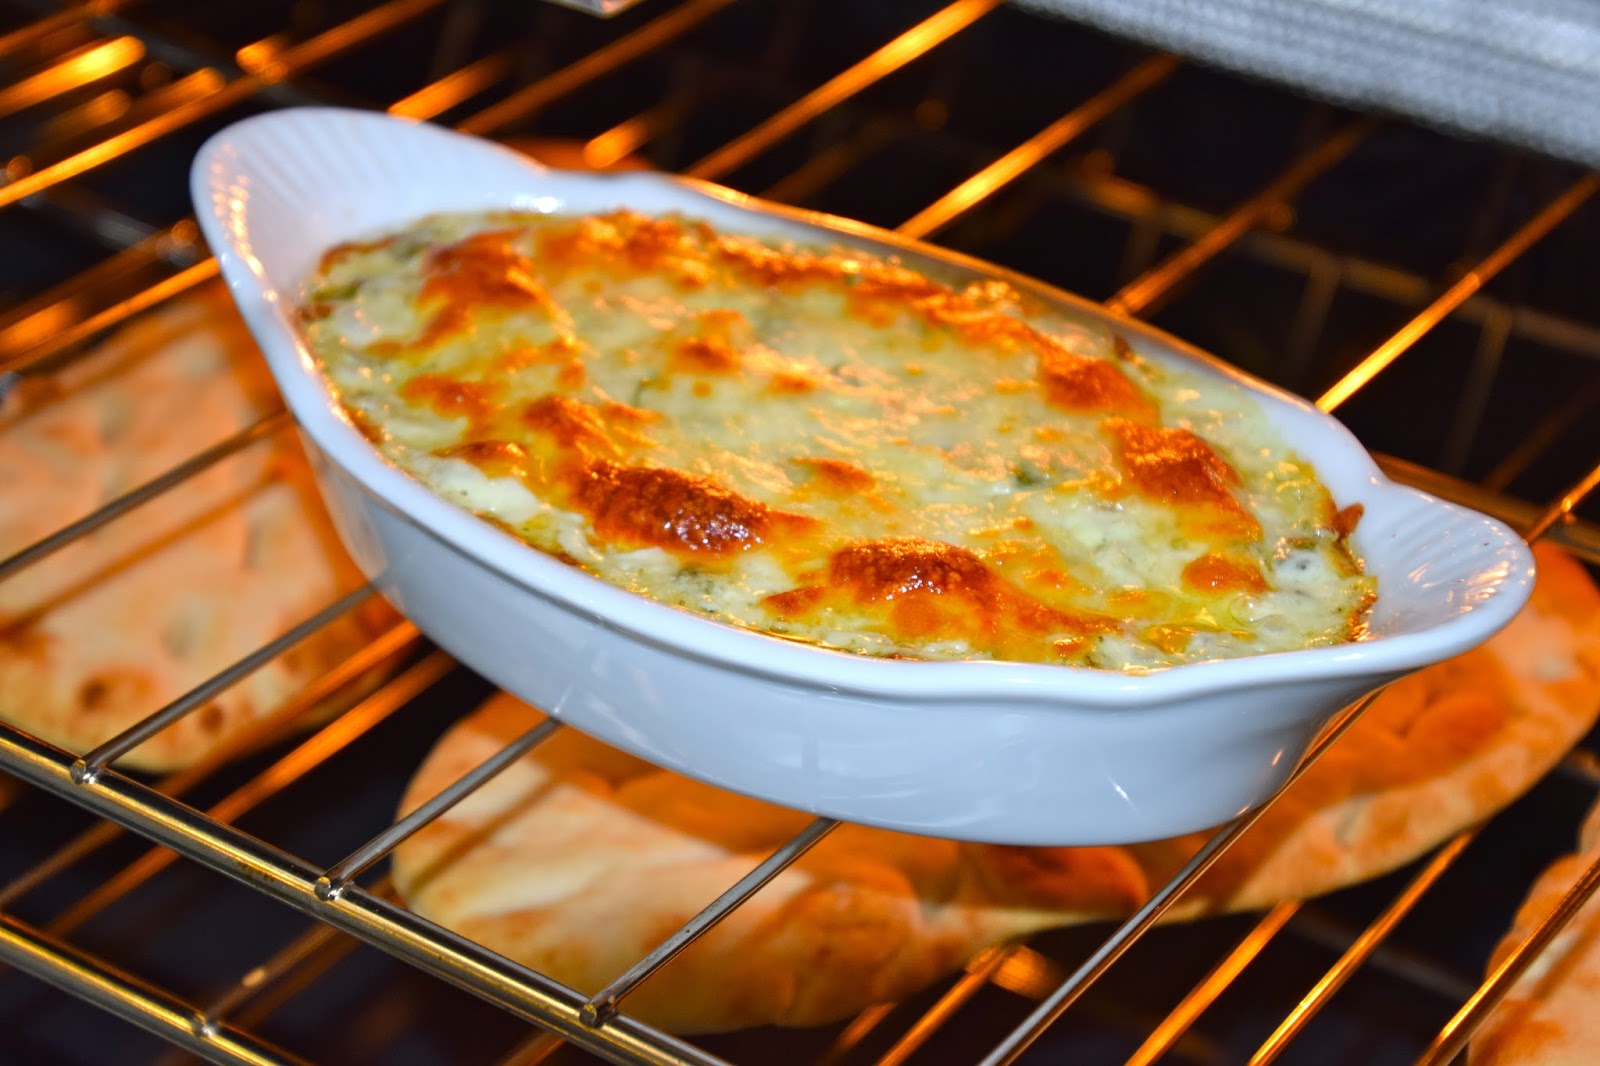
For an appetizer, we bake one of my spinach artichoke dips on the grill. I make a bunch at a time and freeze them in tin foil pans, so all we have to do is take them out of the freezer in the morning to defrost and they're ready to grill!

We serve the spin dip with Naan bread, which we buy at Costco and heat right on the grill.  

When the naan is ready we cut it with the pizza cutter and serve it off of the pizza plate--why dirty more dishes!

We buy take-and bake pizzas from the grocery store to grill. They always have different kinds to try: buffalo chicken, BBQ chicken, even BLT pizza.
  
The pizzas we buy can be grilled right in the pan they come in, otherwise we use a pizza pan wrapped in tin foil for easy clean-up.

See why I love easy grilled pizza night?!?!?

Cheers to Summer dinners on the deck!

DIY Bottles for Glass Door Shower

Tuesday, June 16, 2015

Last year we remodeled our main floor bathroom, which we also use as the master. It's a fairly small bathroom so we wanted to install a glass shower door to make the room appear larger, and to make it have more of a 'Spa' feel.  My biggest concern was not what tile to install, but what do with out shampoo bottles since they'd now be visible to the world.  

Here is an example of the products we had in our bath.  No way was I having green and orange packaging in my new spa bath!

I looked all over for solutions but they simply don't exist. I couldn't believe it! I'm thankful I'm crafty because I don't know what non-crafters with glass shower doors do!


My goal was to make consistent white packaging for all of my products.  I was limited by the height of the shelf in my shower, but soon found these Fiji water bottles that fit.  They also came in different sizes that I could use for facewash, etc.  A couple coats of white spray paint and some pumps from Aveda was all it took to transform water bottles into our new shower set!


I ordered ceramic labels from Etsy, custom made for the specific products I use.  I found these bottles at AxMan Surplus for my bath bubbles and salts.


Here is how the bottles look in our new bathroom! I'm so glad to have it free of mis-matched orange and green bottles!

My Favorite Spinach Artichoke Dip

Friday, June 12, 2015

We hardly ever order spinach artichoke dip in restaurants, because it's never as good as I make at home!  I love this recipe because it's creamy and cheesy instead of greasy. Its also a nice mix between creamiess and spinach/artichokes.

Spinach and Artichoke Dip
2 c. shredded mozzarella cheese, plus more to sprinkle on top
1/2 c. sour cream
1/4c. grated parmesan cheese
1/4 tsp. black pepper
2 cloves garlic, minced
1-14oz. can artichoke hearts, drained and chopped
1-8oz. block cream cheese, set out to soften
1/2 bag fresh spinach, chopped

Preheat over to 350 degrees.  Mix all ingredients together, either by hand or as I prefer, in the Kitchenaid Mixer. Spoon into a ceramic pie pan, or two ramekins.  Top with mozzarella cheese and bake for 30 min. or until brown and bubbly.  We serve with naan bread, but it's also great with pita or tortilla strips or veggies.

Mix.......

Bake....

Enjoy!

If you shop at Costco, the ingredients purchased will allow you to make the recipe times six. Six! Hello freezer!

I make all six at once, since although it's an easy recipe it can be messy to chop the spinach and artichokes. i freeze some in large tinfoil pans for company, and some I split and freeze in smaller pans for just the two of us.

 Here's the outcome of our last batch--now we are set for summer!


Colorful Deck Flowers Hack

Tuesday, June 2, 2015

One of my best finds has been Costco's plant and flower baskets.  They're only $20 each which is very reasonable  even compared to plating your own, and the plants are full and overhanging so it doesn't take all summer for them to come in.  Every year I buy two for the front step and two for the deck.

This year I found some really funky plants for the deck, but I thought they lacked a pop of color. I didn't think there was room in the pots to add more flowers, so I thought I'd stick in some fake blooms (I probably couldn't keep real flowers alive anyway!)

I found these on clearance at JoAnn's and they were just the red/orange color that I wanted.  The tag said they were for indoor use only as colors would bleed, so I sprayed them with varnish before sticking them in the plant (proof I'm a better crafter than gardener).

 Before                                       After

The fake flowers are perfect for adding the pop of color that was needed. Now the deck is colorful and ready for a summer of deck sitting!

Classy Teacher Retirement Party

Monday, May 25, 2015

Last year my mom retired after teaching elementary for 37 years.  For her retirement party, I wanted to keep it school themed but also wanted it to be bright, colorful, modern, and classy.  Here are a few pictures of the party details!
Welcome to the Party
-I ordered a photo blanket from collage.com with photos of all of my Mom's classes.  It hung for decoration at the party and my mom got to keep it afterwards

-In powerpoint I created a poster using all of the class photos, in order, and typed text over the top. I had it printed in color at Staples for around $20

-We used the book 'The Giving Tree' as a guest book.  Red pens were set out so the ink would be consistent and stand out on the pages.  Instructions to sign the book were printed in chalkboard font and displayed in a frame.

-Instead of a card 'box', I set out a book bag for cards to keep with the school theme.  I chose a plain white bag from Michaels and used my cricut to make the CARDS banner that hung from zipper to zipper

-Flowers displayed in pencil vase and votives in crayon votive holder

-Digital photo frame flashed pictures of all the classes she taught over the years

-A printed photo of her first class was displayed in a frame, labeled using chalkboard font.
Have Something to Eat
-A simple and classy menu for summer: Chicken Salad Croissants, Strawberry Spinach Salad, Lemon Orzo Pasta Salad, and Fruit

-I used Crayola paint samples from Menards to create the food labels and printed the text using crayon font in a coordinating colors

-Chalkboard ABC ribbon tied around jars to hold silverware

-A single large vase of Green Apples popped against my purple tablecloth, and was a fun way to incorporate 'teachers apples'.

Don't Forget Dessert
-The dessert table banner read 'Retirement is Sweet' and was made using a cricut and gluing letters to ribbon

-To create the cupcake toppers, I used an alphabet mold from Michael's to create different colored candy letters using Wilton candy melts in bright colors.  It was time consuming since I only had one mold but easy to do in advance. I spelled 'Congrats Kathy' in cupcakes and displayed on a stand in the center of the dessert table

-I made school bus wrappers for Hershey's Nuggets by designing in powerpoint and printing on yellow paper

-Alphabet cookies from Trader Joe's fit the theme and were great for young guests

And of Course--Wine!
-We set-up a wine station on my Mom's center island so guests would feel welcome to help themselves

-Insulated beverage tubs are great for displaying white whites while keeping them cold, and look stunning for a party

-I have boxes of Libbey wine glasses just for parties. They come in packs of 12 and are easy to store in boxes and transport. I set them out on stacked trays so a lot of glasses can be set out at once without taking too  much room

-Farmers market flowers in pencil vases tied in the teacher theme and added color to the wine station.  

COWgradulations Funny Graduation Card

Wednesday, May 13, 2015

Last year my cousin Zach graduated from high school.  Since he worked on a dairy farm I wanted to make him a card with cows.  I cut out the cow using my Animal Kingdom Cricut cartridge, added googly eyes and a graduation cap sticker.  I placed tape over the 'Con' on my 'congratulations' stamp, then used stickers to add 'COW' in place on 'Con'.  The background and border was his school colors, but you could use any color card stock.

Painted Countertops: 6 Years Later

Wednesday, March 4, 2015

We're in the process of remodeling our kitchen and in celebration of the dumpster containing the old cabinets and countertops (shown above) being hauled away this morning, I thought I'd give an up-date on our painted faux granite kitchen countertops.  

It's been almost 6 years since we painted our countertop and many people have e-mailed me inquiring about how the paint job has held-up.  Overall I would say it held-up very well aside from minor scratches that have dulled the shine.  
(keep in mind our countertops are black, so these photos have really been lightened to show the scratches which weren't' that bad in read life).

Ideally we should have put a new seal coat on probably every year which would have helped with the minor scratches. 

There were a few spots where the feet of our small appliances made dents in the paint overtime, as shown here:

In hindsight I'm glad we painted our countertops when we did, as it was inexpensive and allowed us to visually up-date the kitchen until we were ready to remodel and purchase stone countertops.  I would not say it's an alternative to granite, but rather a better option than ugly laminate countertops.  


Organizing with Bankers Boxes

Thursday, February 19, 2015

We are very lucky to have a walk-in closet in our guest bedroom, which we've re-named the 'party closet' because it stores all of my party gear.  The space is great except every time I would get something out I found myself having to re-organize the entire closet, which is the last thing I wanted to do on top of cleaning up a party. I decided there was a better way to organize it to make everything more accessible.

Here is a before picture of the closet.  Although it looks really messy and unorganized it really wasn't.  I had actually set everything neatly on shelves.  The issue was that everything was a different size making it hard to neatly line-up and stack.

In order to make everything a consistent size, I used bankers boxes to store all of the random goods. At first it seemed like a waste of space since larger awkward items left a lot of dead space in the box, but everything ended up fitting into the closet better when in boxes, and looked much more organized.


I created labels for the boxes by running card stock through the printer.  Not only does it make it easy to find what I'm looking for, but it no longer looks like a bunch of files stacked in the closet.  Storing our party items this way has also been great for lending out party items since everything is wrapped-up inside and already boxed.

Due to the gained space I was able to move all of my tablecloths from hangers to a spare shelf:

Before                                   After

Blogger Template created by Photographic Elements