Pages

Christmas Scrapbook

Sunday, December 18, 2011

I keep a Christmas Scrapbook that I store with the Christmas stuff and only bring out once a year. It's not much now, but I'm hoping that in 30 years it will be really fun to look back on! Contrary to popular belief, I don't do much actual scrapbooking, but 2 pages a year is easy to maintain!
Each year I include:
1. Our Christmas card
2. A hand-written summary of how we celebrated Christmas
3. A few key photos of major activities, events or gifts

Here are a few pics of what I have so far:

Christmas Card Book

Sunday, December 11, 2011

Christmas cards are my favorite thing about Christmas time!  I love checking the mailbox and seeing all of the different photos and card designs. 

 I always save Christmas cards, but didn't know what to do with them other than put them in a ziplock inside my Christmas bins.  

Last Christmas at my parents, we went through my mom's stack of old cards.  We read some holiday letters that were over 20 years old from our old neighbors who passed away many years ago.   That's where I got the idea to keep them all in a book to bring out each year at Christmas time!

I got this red leather, three-hole binder at Archiver's to store my old cards.  It has cute metal corners and works great!

I use a 3-hole punch on the cards, photos, and letters to get them in the book.  By staggering the holes, you can see more cards at once and the book doesn't get lop-sided.
I decorate a page with the year and slip it in a plastic page protector to separate years.

Scrapbooking stickers label the side of the book.  
It's fun to set this out on the coffee table at Christmas time!


Christmas Card Display Strip

Sunday, December 4, 2011

 We started to get Christmas cards so I made this Christmas card display strip to hold them. It was inexpensive, easy to store, and can easily be transferred if we move or decide to hang elsewhere!  I love that it can go in a visible area but is still on a wall that's out of the way!

1.  Cut ribbon to desired wall length (about 7' for mine).  Note that this could also go horizontal.  I found my glitter ribbon at Michael's in the floral section.  It has wired edges for more stability.
2.  Use a hot glue gun to secure large paper clips to the back of the ribbon
3.  Use a small tack to pin the ribbon to the wall at the top and bottom of the ribbon.
I think this was the easiest thing I've ever made! I can't wait to see it filled up!

Here's a close-up of the paper clips glued to the back:
 

Here's an example of how the paper clips hold the cards:


Easy Holiday Card

Saturday, December 3, 2011

1. Print 'Happy Holidays' on the computer.
2. Cut squares out of scrap paper
3. Add ribbon to squares to make it a gift.

Wine Cork Letters

Sunday, November 27, 2011

I made a few of these wine cork letters to give as gifts.  They were so easy and fun to make, and easy to take to craft club!  Thanks to everyone who contributed corks!
I started with these wooden letters from Hobby Lobby. Then, I put tacky glue over the entire letter and hot glued individual corks.


They stand on their own to display on a mantle or shelf, but would look cute hanging on a wall too!

Holiday Rosette Wreath

Thursday, November 24, 2011

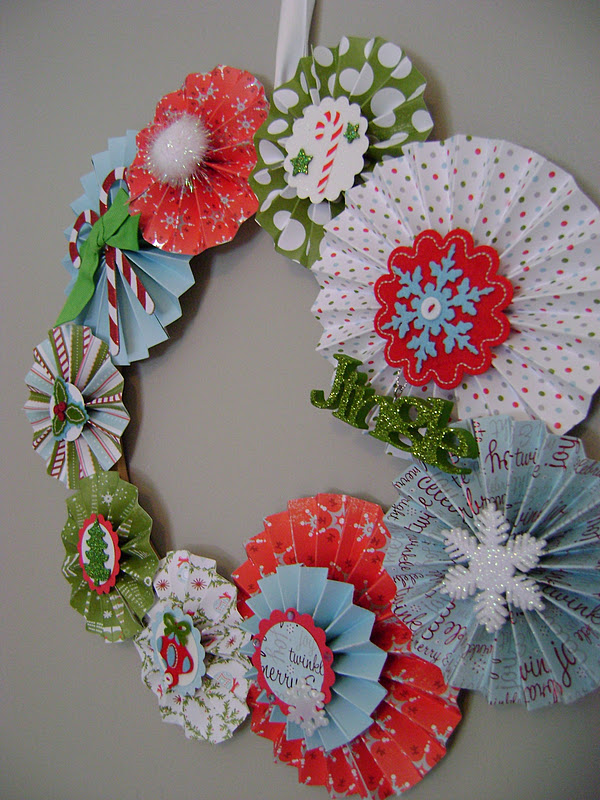
This paper rosette wreath was my gift for my partner in the Holiday Gift Exchange from Craftaholics Anonymous.  It was fun to make and give!  My partner was Carey from Utah, here is her Blog!

To make the rosettes, I cut two strips of paper about 1.5-2" wide by 12" or 8", depending on the paper I was using.  Then, I scored lines every 0.5" so they could easily be folded.

 Once the paper was folded, I used a tape gun to connect the two strips of paper into one continuous ring, making sure to overlap the folds on the ends.

 This is what the ring looks like once the two strips are glued together.
 With the pattern I wanted to show face down, I bent one side toward the center to make the ring into a rosette.
 They are pretty springy due to all of the folds, so I had to use a hot glue gun to hold the rosette in place.
 I placed a small piece of scrap paper over the hot glue to hold everything together.
Here are the completed rosettes ready to be glued to the wreath!
 I found this ring in the floral section of Michaels which I used as the wreath base.  There were already holes drilled through it, so I tied a ribbon through one of the holes for a hanger before covering it with the rosettes.
 Fray-Check glue helps keep the ends of the ribbon from fraying.
 I used hot glue again to secure the rosettes to the wreath base.  Not complete without some sparkle and embellishments!
Here is the finished product:

This was so much fun to make, I made two more like this for my mom and mother-in-law.  I'm giving them to them at Thanksgiving so they can hang them throughout December!

Initials Love Card

Sunday, November 20, 2011

These cards have been great for engagements, showers, and weddings.  The bark texture is from a cuttle bug template.  I left the hearts blank and added the couple's initials before giving.

Address Wall Art

Sunday, November 13, 2011


  I was inspired to make my address wall art by this piece at Restoration Hardware.  I wanted something similar but with our actual address.  Mine turned out very different, but I still like it!


To make, I bought an old piece of art at Goodwill, spray painted the frame silver and painted over the picture with some leftover brown paint (the glass broke in the process, which turned out to be a blessing because I could make it more 3-D!).  The letters are just scrap booking stickers.  I printed large numbers to use as a pattern and cut the numbers out of foam paper, then decorated each one a different way:  
Thick silver acrylic paint
 
Black ink pad rubbed on edges
 Numbers stamped with black ink
Silver Gold-Leafing

Here it is hanging in our living room!

House Number Art

Sunday, November 6, 2011

 We recently re-did the exterior of our house and our old brown house numbers no longer match.  So, I used them to make this wall hanging for our entryway!  I love it because the numbers were actually salvaged from our house!

Here are the numbers that use to be on our house.  I'm so glad the contractors saved them for me!

Some thin, rustic rope and scrap booking paper make the letters more decorative in the frame.  I added texture to plain brown paper using my scoring board.

Here's a close-up of one of the numbers in the frame.

Birthday Banner Card

Friday, November 4, 2011


Blogger Template created by Photographic Elements