Pages

Sunday, January 26, 2014

Felt Heart Wreath


Although this heart wreath is made out of felt, it almost looks like roses from far away. It was easy and inexpensive to make, although it took some time!
I started with a 12" foam heart from JoAnn's.  I traced the bottom of a soup can to create a circle template, them cut about 200 circles out of red felt.  I folded the fabric to cut more than one a time, but it still took a while!
I then folded the circles in half, then half again, and used a pin to hold the fold and apply the felt circles to the front side of the foam heart.


I strongly suggest investing in one of these thimbles if you are going to be pushing in a lot of pins to make a wreath--totally worth it!

I pinned a pink ribbon to the back so the wreath could be hung. Here it is on my door!

Sunday, January 19, 2014

Simple Holiday Cards Cricut Cartridge Tutorial


The Simple Holiday Cards Cricut Cartridge was one of my Black Friday purchases from JoAnn's this year.  Since it comes with no instructions, even online (thanks Cricut!!), I thought I'd share.  It took me about half a day to figure out, but now I think I have it! 

Here are my two biggest questions answered:

1.  What size paper do I use?  It made sense to me to use a sheet of paper cut in half like I would use if I were making a card (8.5"x5.5"), but it didn't say anywhere so I had to guess.  The cartridge is set-up to take a full sheet of paper, cut out the design, then cut out the card.  However, I found that if you position the 8.5"x5.5"paper correctly on the mat, it will cut out the design and you can stop the machine before it starts to cut out the perimeter of the card.

So this leads me to my next question......

2. How do you load the paper for making vertical and horizontal cards?  I had to play around with this a bit to find the exact position, which I then marked on my Cricut mat using a permanent marker. I'm not sure if each Cricut is the same, but this is how I positioned the paper on my mat. Once I had this, all horizontal cards were the same, and all vertical cards were the same.

Positioning for Vertical Cards:
-Lay paper vertical
-From starting position, move paper 3/16" to the left
-Move paper down 7/16"


Positioning for Horizontal Cards:

-Lay paper horizontal
-From starting position, move paper 1/4" to the left
-Move paper down 7/16" 

Once I got it figured out I love the cards it makes, and I think the cartridge has easily paid for itself! I did not have any trouble with it cutting out the small detail, but I did run my Cricut on a low speed.  Here are some of the cards I made using the Simple Holiday Cards Cricut Cartridge:


Sunday, January 12, 2014

Box of Homemade Cards Gift

A few years ago I made some cards for my mom and mother in law which were a big hit as it saved them from always having to go and buy cards. Whenever I make cards I usually make a few of the same style, as it's just as easy as making one.  I decided to make a box of cards for my mom and mother in law again using the extra cards I make.  After about a year and a half of making cards at craft club, they each got a box of 130+ cards for Christmas!

That's a lot of cards!

The dividers are made out of index cards to distinguish the different occasions.  I printed the titles on colored paper, cut, and glued them to the top of the index cards.

I included this birthday calendar which I printed from here so they can easily keep track of everyone's birthdays.

Here it is all packed up with envelopes and ready to give!

Here are some examples of the different cards I included by occasion.
Baby:

Engagement/Wedding/Bridal Shower/Bachelorette:

Any Occasion:

New Home:

Sympathy:

Holidays:

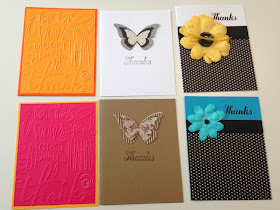
Thank You:

Boy Birthday:

Girl Birthday:


Sunday, January 5, 2014

Balloon Gift Wrap

I have quite a few balloons left over from the Birthday Wreath I made a while back, so I thought it would be fun to use them to embellish a birthday gift! I just tied them to some ribbon to add some color and texture to the wrap.

Thursday, January 2, 2014

2014 Calendar

I have been waiting for 2014 to hit just so I could hang my new 2014 Paper Source Calendar!
I bought it back in October because I loved the bright colors and knew that I could use the paper for crafts when I was done with it.  When I discovered that the calendar had built in craft projects on the back side I had to purchase it!

  Here are the designs for each month:

 Some of the projects it includes:

A template on the back-side of the calendar page for one of the projects:
I can't wait for January to be over to make something!