Pages

Sunday, December 29, 2013

Card Sending Kit


I wanted to give the grandparents a gift that they needed and would actually use. They always send cards for birthdays and other occasions, so I put together this 'Card Sending Kit' for Christmas so they would have supplies for the entire year!

The kit included:
-Boy and girl birthday card packs from the Target one spot
-Pack of all occasion cards (we ordered from the neighbor boy's fundraiser catalog)
-Clear hard case for storing and writing on
-'Birthdays and Anniversaries List' printed from here
-Stickers for the outside of envelopes
-Wax seal with stamp
-Fun Pen
-Postage Stamps


Monday, December 23, 2013

Chalkboard Themed Christmas Cards 2013

For this year's Christmas card I decided to be trendy and go with a chalkboard theme! We send out 120+ cards so I'm always looking for ways to keep the cost of our cards low.

PHOTO- 4x6 photos are much less expensive than ordering cards, so we included the greeting in our photo and just had prints made.  We made the chalkboard by purchasing a frame at Goodwill, spray painting it red, cutting a board and spray painting it with chalkboard paint before inserting into the frame.  We went to a lot that was selling Christmas trees to have our photo taken.

LETTER- I made the letter in powerpoint by downloading a chalkboard background and some chalkboard fonts.  We had Black and White copies made at Staples, as it would have burned through a lot of our ink!

NOTE-In some of the cards I included a short note.  To keep with the chalkboard theme, I used a white gel pen to write on black paper.

ENVELOPE-Red envelopes from Target added some color and matched the frame in our photo. I found a chalkboard Christmas greeting on Google Images which I copied into powerpoint, printed on full sheet labels, and cut out with a circle punch.  We printed the labels using the chalkboard fonts from the letter to tie in the theme.

MERRY CHRISTMAS!

Sunday, December 22, 2013

Christmas Card Activity

Since I love making crafts, I planned a couple of Christmas themed crafts for our Christmas guests to make while I prepared for our next meal.  I planned crafts that were easy to make, set out all of the supplies, and included an example. One of these crafts was this simple Holiday card that everyone got to make and take home!

Supplies needed:
8.5x11" paper cut in half for card
Christmas paper for ornaments
Large and small circle punches
Glue stick
Pen for drawing ornament string
Christmas Greeting Stamps
Ink Pad

Use circle punches to cut Christmas ornaments out of christmas themed paper.  Glue to card, and use a black pen to draw the string and bow for the ornament. To make the 3D ornament, cut 4 circles and fold each one in half.  Glue back sides together to create the accordion bulb, then glue final two backsides to card.  Use a stamp to stamp a Christmas Greeting.

Friday, December 20, 2013

Veggie Crescent Christmas Wreath Appetizer

This is a very easy and festive Christmas appetizer that's great to bring to any party.  I love it because I make it on the same dish as my Christmas Breakfast Pastry Ring, so when traveling I can easily bring one and make the other dish when I'm there. My platter is this one from Crate and Barrel.


Veggie Crescent Christmas Wreath Appetizer
2 (8 ounce) packages crescent rolls1 (8 ounce) package cream cheese, softened1 cup sour cream1 packed ranch dressing mix1 broccoli (1 small crown chopped into small florets)cherry tomatoes1 sweet red pepper 


Directions:
Preheat the oven to 375 degrees.  Remove the crescent roll dough from its packaging BUT DON'T UNROLL IT. Cut each tube into 1/2" slices and arrange the slices in a circle on ungreased baking sheet.Bake dough wreath for 15-20 minutes or until the dough turns a lovely golden color. Cool completely.


In small bowl, beat the sour cream and cream cheese together until smooth. Mix in ranch seasoning. Refrigerate until ready to spread on wreath.


When ready to assemble, spread the cheese mixture over the baked wreath. Arrange broccoli florets and tomatoes around the wreath to decorate.  Cut the pepper and arrange on wreath to resemble a red bow.  Refrigerate until ready to serve.

Here is a close-up of the pepper bow:

To easily transport, place a plastic cup in the middle of the wreath and cover with foil.  It will arrive in perfect condition!


Tuesday, December 17, 2013

Santa Breakfast

When we hosted Christmas last year, everyone slept over so we had a Santa Breakfast before opening gifts! Here are the details:
Muffin Centerpiece with Santa muffin toppers

White linens with red chargers and napkins wrapped in 'Santa's Belt' paper napkin rings

Paper place cards with Santa's Hat stickers

Santa Pancakes (Instructions are here)

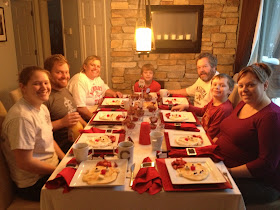
The entire gang with their Santa Pancakes. Each Pancake had its own personality so it was fun to see them all together!!


Saturday, December 14, 2013

Christmas Wrap 2013


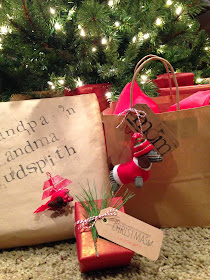
Each year I choose a 'theme' to wrap all of my Christmas gifts.  I love when all of the gifts match under the tree!  I usually go with a silver/glitter/snowflake theme like I did here, but this year I wanted to try something different.  I decided to use kraft paper to create a 'traditional rustic Christmas' theme that would go great with our family room tree and decor! The great part was that kraft paper is very inexpensive, so I didn't feel bad using it to wrap the larger gifts.


I stamped names on tags or directly onto the packages using some letter stamps that I had.  I love the look it created, and it's easy for everyone to spot their gift under the tree.

For some gifts I stamped a Christmas greeting on a kraft tag and wrote the names in red marker.

Red washi tape was perfect for adding some color to the packages.  It was much more inexpensive then bows and ribbon, and we don't have to worry about it getting smashed when packing and transporting the gifts.

I added embellishments to a few gifts to add some interest, which included fun ornaments and pine needles I picked up in our yard.


Thursday, December 12, 2013

Christmas Breakfast Pastry Ring

This past weekend we went to a holiday brunch at a friend's house. I wanted to bring something sweet and festive, which is how I came across this recipe from Pampered Chef which was perfect!  It was easy and delicious.  I made mine with Strawberry pie filling so the red color was perfect for Christmas, but blueberry would have been delicious too!  I think it might become a regular side to breakfast egg bake when we have company!

Cherry Cheese Ring

Ring and Filling:
2 packages refrigerated crescent rolls
1 8oz.  package cream cheese softened
1/4 cup powdered sugar
1 egg
1/2 teaspoon vanilla or almond extract
1  can cherry pie filling ( I use Strawberry)

Glaze:
1/2 cup powdered sugar
2 to 3 teaspoons milk

Heat oven to 350 degrees F

Unroll crescent dough. Separate into 16 triangles; reserve 4 triangles for decoration. On a 15" stone or oven safe platter, arrange 12 triangles in a circle with wide ends toward the outside edge and points toward the center. Using a small roller or water glass, roll dough to 14-inch circle, pressing seams together to seal and leaving a 3-inch hole in the center

For filling, combine cream cheese, icing sugar, egg and vanilla extract. Spread cream cheese mixture over dough to within 1/2 inch of the edge; top with pie filling.

Cut each remaining triangle into thirds, staring at the wide end opposite the point and cutting lengthwise to the point.  Arrange dough strips evenly in spoke like fashion over filling.  Press ends to seal at center and outer edges. Bake 25 to 30 minutes or until golden brown.

When cool, mix powdered sugar and milk until smooth to create the glaze: drizzle over ring.  A pizza cutter worked great to cut the ring into slices and serve.

Sunday, December 8, 2013

Santa Pancakes


Santa Pancakes are a tradition for us at Christmas time.  Here's how I make them:
Face-Regular pancake made from mix
Hat-Sliced strawberries mixed with sugar
Ears- Banana slice cut in half
Eyes- Banana slice with chocolate chip
Nose-Maraschino Cherry
Beard & Had Trim-Whipped cream in a can

Sunday, December 1, 2013

Christmas Roll-ups

These are my go-to appetizer for any holiday party from family events to ugly sweater parties! They are easy to make, festive in color, and taste great too.
Ingredients:
3/4 c. package dried sweetened cranberries
1 8 oz container cream cheese spread
1 cup crumbled feta cheese
1/4 cup chopped green onion
 4 large spinach tortillas


Directions:
1. Combine all ingredients except tortillas, mix well. 
2. Divide spread mixture evenly among tortillas and spread over tortilla.  Roll each tortilla tightly.
3. Wrap rolls in plastic wrap and place in the fridge or freezer for about an hour so the spread firms and is easier to cut.
4. Cut each roll into slices and serve.

Sunday, November 24, 2013

Purple & Lime Green Bridal Shower

Here are some pics from the Bridal shower I hosted for my now sister-in-law Amy.  Amy is a 'Purple Person' so it was fun to work off of a color to come up with a purple and lime green bridal shower!
Purple linens and place mats, with notecards for guests to write Amy a note to open on a day leading up to the wedding.

'Love is Sweet' purple and green candy buffet for favors.  Amy likes penguins, so we had bride and groom penguin cake toppers with a 'Mr & Mrs' banner.

Kids' activity bags, and prize bags for Amy for answering a question about her fiance correctly.

The kids' goodie bags included a mini vail, ring pop, snacks incase they didn't like our adult food, and an 'Amy's Wedding' themed activity book.

Sunday, November 17, 2013

Frogs, Snails, and Puppy Dog Tails Baby Shower

Here are some looong overdue pics from my nephew's baby shower that I hosted with my aunt.  The theme we chose was 'Frogs, Snails, and Puppy  Dog Tails, that's what little boys are made of'.


This was the first time I bought a party pack from Etsy, and it was so easy! All we had to do was print and assemble.  I would recommend doing this for any themed party.  We bought our pack (shown above) from 3 Little Monkeys Studio.  I loved the colors and design, so when I saw it, it was a done deal!

Games, decor, and favors.
The food including labels, picks, and cones from the party pack, and a fruit bowl baby carriage made by my mom!


Friday, November 15, 2013

'Fan Necklaces'-College Football Kids Craft

This is another easy kids' craft for game day. Use string and pony beads to make a necklace or bracelet in your team colors.

Sunday, November 10, 2013

Monster Cookies


This recipe for Monster Cookies is one of my favorite cookie recipes.  I wanted to make them for tailgating since they're so hearty and everyone loves them.  I also thought it would be a fun way to incorporate our team colors into the food with Maroon and Gold M&M's!

I was planning on going to the party store to overpay for Maroon and Gold M&M's, but thankfully I came across these Fall M&M's at Target.
 
I just had to sort out the Maroon and Gold ones and we were set!

Monster Cookies
3 eggs
1 c. brown sugar
1 c. white sugar
1 tsp. vanilla
1 tsp. light corn syrup
1/2 c. butter, room temperature
1 1/2 c. peanut butter
4 1/2 c. oatmeal
1/2 c. flour
2 tsp. baking soda
1 c. chocolate chips
1 c. M&Ms
Preheat oven to 350 degrees. In a mixing bowl, combine the eggs and then sugars, vanilla, corn syrup, butter, and peanut butter. In a separate bowl, combine oatmeal, flour, and baking soda. Combine the dry ingredients with the peanut butter mixture. Stir in chocolate chips and M&Ms. Drop desired sized spoonfuls on to a cookie sheet. Bake about 12minutes.

These Freeze well too!

Sunday, November 3, 2013

'Cheer Sticks' College Football Kids Craft

We made these cheer sticks with our friends' kids to wave and cheer on the Gophers a couple of weeks ago! It was hard to find College football crafts, so I wanted to share!

Supplies Needed:
2-Small Paper Plates, themed if possible
Ribbon, cut into pieces about 8-12" Long
Paint Stick
Tape
Football Embellishments if desired

Here are the Gopher dessert plates I used, which came in a party pack from Costco

Maroon and Gold ribbon, and some special Gopher ribbon I found at Michael's!

 I thought these felt football embellishments would also be fun, and I knew I'd use the other sports for other projects.

To make, tape the ribbons to the backside of a plate. Tape the paint stick to the back of the plate, then another plate on top! Here is a side view to see how it's held together:

Wednesday, October 30, 2013

Spooky Dinner


Tonight we hosted our first annual Spooky Dinner which was a blast!  We chose the night before Halloween so everyone could make it and still be home to see their trick-or-treaters.  Instead of a costume party, we thought a dinner party would be fun and asked guests to wear something black.

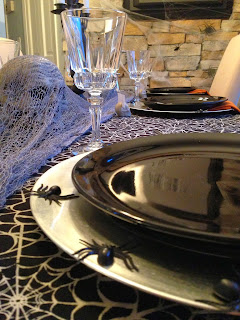
The theme for the table was spiders and skulls, which looked great with candlelight.  I took these photos with the lights on just to show the details!
I chose burnt orange napkins from World Market because 1.) I could use them for Thanksgiving 2.) I thought white would stain 3.) I thought black would fade in the wash.

The crystal goblets are from Goodwill for $0.99 each. I thought they had a 'haunted mansion' feel.  The black plates are also from Goodwill and were $0.99 each.  I needed round plates so I could use silver chargers to hold the creepy plastic spiders!  

I used plastic skulls to create place card holders and printed everyone's names using the font 'Cracked'.

The decor included skeletons hiding throughout the house, a DVD of spooky scenes and sounds, and lots of ripped netting and spider webs!

The menu consisted of regular food that we could easily make more spooky with some changes in color and a spooky name:
I found these halloween tortilla chips at Aldi and 'Skeleton Bones' at World Market that made planning the appetizers easy!

Just some of the spooky things we ate for dinner:


Here is the dining table with lights off--Spooky!

Happy Halloween!!